Spring Boot meets Swagger UI: Part I

Hello again! As promised in the last blog, I want to dedicate this one to Swagger UI and how it can be configured for Spring Boot application to document your REST API. If you are not familiar with Spring Boot and how to set up a simple web service, I would suggest reading Building a RESTFul Web Service with Spring Boot. It is as simple as it can get with no server setup, no hundreds of lines of boilerplate code, easy to integrate other Spring applications and most importantly, saves a hell lot of valuable developer time!

Swagger UI is an open-source tool that automatically generates documentation from your API definition for visual interaction and easy consumption. Meaning, you as a backend developer build your REST API with multiple controllers, lots of GET, POST and DELETE requests. It is your job to make sure whoever is consuming that API knows how to actually interact with it, what are all the endpoints available, which parameters to pass, is there a need of token, etc. We have been through the age of word/pdf docs and most commonly building a static web page for developers for documenting REST API. After that, the frontend devs can use Postman or similar tools to actually test the API before using it. Swagger UI is the easiest way to replace all of this and save hard work. It is probably one of the sophisticated ways to document and quickly test your REST API.

I thought of using Swagger UI for one of my personal projects and believe it or not, with just a few lines of code my setup was ready. So without wasting any more time, let’s get started! 

I created a demo Spring Boot Application with a GET request to fetch all the employee information. Typically I use IntelliJ IDEA for writing code:

package com.blogexampleone.demo;
import com.fasterxml.jackson.databind.ObjectMapper;
import com.fasterxml.jackson.databind.SerializationFeature;
import org.springframework.boot.SpringApplication;
import org.springframework.boot.autoconfigure.SpringBootApplication;
import org.springframework.context.annotation.Bean;
@SpringBootApplication
public class DemoApplication {
public static void main(String[] args) {
SpringApplication.run(DemoApplication.class, args);
}
@Bean
public ObjectMapper objectMapper() {
ObjectMapper objectMapper = new ObjectMapper();
objectMapper.enable(SerializationFeature.INDENT_OUTPUT);
return objectMapper;
}
}

package com.blogexampleone.demo.Model;
public class Employee {
private long id;
private String name;
private String phone;
private String department;
private String jobTitle;
public Employee(long id, String name, String phone, String department, String jobTitle) {
this.id = id;
this.name = name;
this.phone = phone;
this.department = department;
this.jobTitle = jobTitle;
}
public long getId() {
return id;
}
public void setId(long id) {
this.id = id;
}
public String getName() {
return name;
}
public void setName(String name) {
this.name = name;
}
public String getPhone() {
return phone;
}
public void setPhone(String phone) {
this.phone = phone;
}
public String getDepartment() {
return department;
}
public void setDepartment(String department) {
this.department = department;
}
public String getJobTitle() {
return jobTitle;
}
public void setJobTitle(String jobTitle) {
this.jobTitle = jobTitle;
}
}
view raw Employee.java hosted with ❤ by GitHub

package com.blogexampleone.demo.Controller;
import com.blogexampleone.demo.Model.Employee;
import com.blogexampleone.demo.Service.EmployeeService;
import org.springframework.beans.factory.annotation.Autowired;
import org.springframework.http.HttpStatus;
import org.springframework.http.ResponseEntity;
import org.springframework.web.bind.annotation.RequestMapping;
import org.springframework.web.bind.annotation.RequestMethod;
import org.springframework.web.bind.annotation.RequestParam;
import org.springframework.web.bind.annotation.RestController;
import java.util.List;
@RestController
@RequestMapping("/employee")
public class EmployeeController {
@Autowired
private EmployeeService employeeService;
@RequestMapping(value = "", method = RequestMethod.GET)
public Object getAllUsers() {
List<Employee> employeeList = employeeService.getAllEmployees();
if(employeeList.isEmpty())
return new ResponseEntity<Void>(HttpStatus.NOT_FOUND);
return employeeList;
}
}

package com.blogexampleone.demo.Service;
import com.blogexampleone.demo.Model.Employee;
import java.util.List;
public interface EmployeeService {
List<Employee> getAllEmployees();
}

package com.blogexampleone.demo.Service;
import com.blogexampleone.demo.Model.Employee;
import org.springframework.stereotype.Component;
import java.util.ArrayList;
import java.util.List;
@Component
public class EmployeeServiceImpl implements EmployeeService {
@Override
public List<Employee> getAllEmployees() {
return populateMockDataForEmployees();
}
private List<Employee> populateMockDataForEmployees(){
List<Employee> employeeList = new ArrayList<>();
employeeList.add(new Employee(1, "John Doe", "1234567890", "Technology", "Software Engineer"));
employeeList.add(new Employee(2, "Jane Smith", "9876543210", "Technology", "Sr. Software Engineer"));
employeeList.add(new Employee(3, "Tim Lang", "1029384756", "Business Development", "Asst. Manager"));
employeeList.add(new Employee(4, "Kevin Lee", "5647382910", "Marketing", "Marketing Manager"));
employeeList.add(new Employee(5, "Vanessa Chang", "5554446667", "Technology", "Director"));
return employeeList;
}
}

<?xml version="1.0" encoding="UTF-8"?>
<project xmlns="http://maven.apache.org/POM/4.0.0" xmlns:xsi="http://www.w3.org/2001/XMLSchema-instance"
xsi:schemaLocation="http://maven.apache.org/POM/4.0.0 https://maven.apache.org/xsd/maven-4.0.0.xsd">
<modelVersion>4.0.0</modelVersion>
<parent>
<groupId>org.springframework.boot</groupId>
<artifactId>spring-boot-starter-parent</artifactId>
<version>2.2.5.RELEASE</version>
<relativePath/> <!-- lookup parent from repository -->
</parent>
<groupId>com.blogexampleone</groupId>
<artifactId>demo</artifactId>
<version>0.0.1-SNAPSHOT</version>
<name>demo</name>
<description>Demo project for Spring Boot</description>
<properties>
<java.version>1.8</java.version>
</properties>
<dependencies>
<dependency>
<groupId>org.springframework.boot</groupId>
<artifactId>spring-boot-starter-web</artifactId>
</dependency>
<dependency>
<groupId>org.springframework.boot</groupId>
<artifactId>spring-boot-starter-test</artifactId>
<scope>test</scope>
<exclusions>
<exclusion>
<groupId>org.junit.vintage</groupId>
<artifactId>junit-vintage-engine</artifactId>
</exclusion>
</exclusions>
</dependency>
<dependency>
<groupId>org.springframework.boot</groupId>
<artifactId>spring-boot-starter-web</artifactId>
</dependency>
<dependency>
<groupId>org.modelmapper</groupId>
<artifactId>modelmapper</artifactId>
<version>2.3.5</version>
</dependency>
</dependencies>
<build>
<plugins>
<plugin>
<groupId>org.springframework.boot</groupId>
<artifactId>spring-boot-maven-plugin</artifactId>
</plugin>
</plugins>
</build>
</project>
view raw pom.xml hosted with ❤ by GitHub

After setting up the above code, run your local server and hit http://localhost:8080/employee in the web browser. You should see the following JSON response:

[ {
"id" : 1,
"name" : "John Doe",
"phone" : "1234567890",
"department" : "Technology",
"jobTitle" : "Software Engineer"
}, {
"id" : 2,
"name" : "Jane Smith",
"phone" : "9876543210",
"department" : "Technology",
"jobTitle" : "Sr. Software Engineer"
}, {
"id" : 3,
"name" : "Tim Lang",
"phone" : "1029384756",
"department" : "Business Development",
"jobTitle" : "Asst. Manager"
}, {
"id" : 4,
"name" : "Kevin Lee",
"phone" : "5647382910",
"department" : "Marketing",
"jobTitle" : "Marketing Manager"
}, {
"id" : 5,
"name" : "Vanessa Chang",
"phone" : "5554446667",
"department" : "Technology",
"jobTitle" : "Director"
} ]
view raw response.json hosted with ❤ by GitHub

With that, our basic REST API is ready. Now comes the interesting Swagger part. As we are using Spring Boot, we will use Springfox implementation of Swagger. Springfox is essentially a set of Java libraries that supports Swagger and a bunch of other specifications.

Add the following dependencies for Swagger 2 and Swagger UI to your pom.xml file:

<!--swagger setup-->
<dependency>
<groupId>io.springfox</groupId>
<artifactId>springfox-swagger2</artifactId>
<version>2.9.2</version>
</dependency>
<dependency>
<groupId>io.springfox</groupId>
<artifactId>springfox-swagger-ui</artifactId>
<version>2.9.2</version>
</dependency>
view raw update-pom.xml hosted with ❤ by GitHub

The configuration of Swagger mainly revolves around Docket bean which a builder interface to our application. First thing first, specify the DocumentationType which is SWAGGER_2 in our case. After that, select() method initiates the builder then you can add customize everything, add API, description, endpoints for Swagger to document. Basically, all your config settings go in here. Springfox documentation is the best place to make sense of the following code:

package com.blogexampleone.demo.Config;
import org.springframework.context.annotation.Bean;
import org.springframework.context.annotation.Configuration;
import springfox.documentation.builders.PathSelectors;
import springfox.documentation.builders.RequestHandlerSelectors;
import springfox.documentation.spi.DocumentationType;
import springfox.documentation.spring.web.plugins.Docket;
import springfox.documentation.swagger2.annotations.EnableSwagger2;
@Configuration
@EnableSwagger2
public class SwaggerConfig {
@Bean
public Docket api() {
return new Docket(DocumentationType.SWAGGER_2)
.select()
.apis(RequestHandlerSelectors.any())
.paths(PathSelectors.any())
.build();
}
}

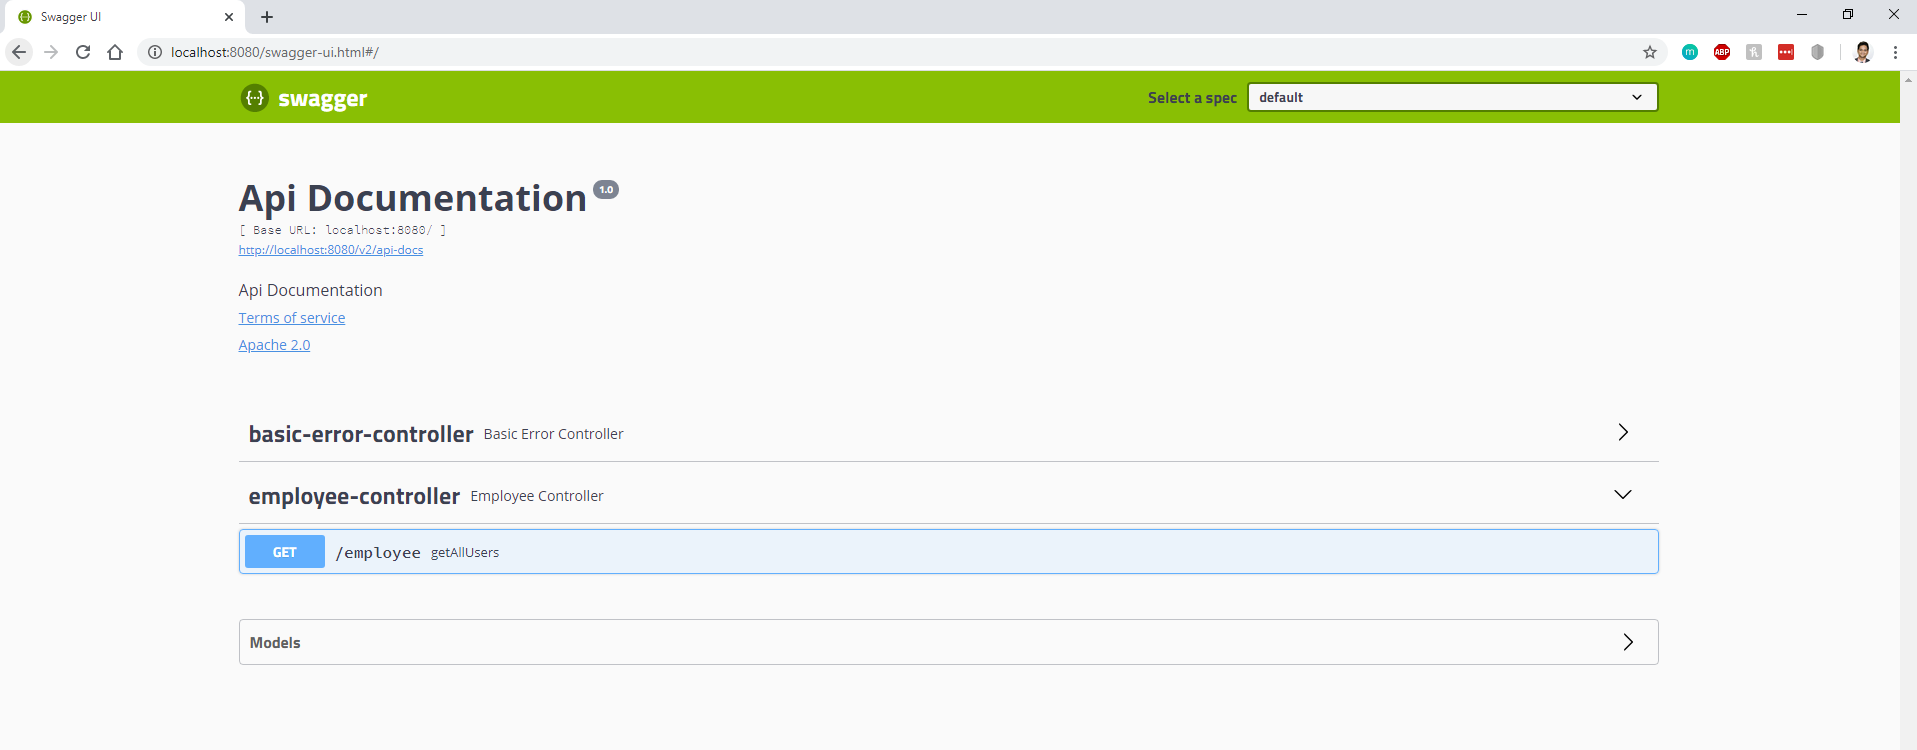
After this quick setup, navigate to http://localhost:8080/swagger-ui.html and you will find a UI page listing down all your API details. Looks great, doesn’t it? 


You can also play around and try out your API, download the response, and so on -


This completes the basic setup. In reality, your code won't be so naive and you will have complex API that needs to be documented properly. While working on my project with Spring Security and OAuth, I encountered an issue to pass JWT token in the Swagger UI. After Stackoverflowing and going through multiple GitHub issues, I came across a solution that worked for me. Let's discuss that in the next blog since that would need OAuth setup along with a bunch of security configs as well.

That's all for this blog. If you've reached till the end, thanks and stay tuned for more!

PS - Sure, the next blog will be a continuation of this. But I will cover alternatives to Swagger in future blogs.
Comments

Popular Posts